Category Archives: Mechanical Maintenance Solutions

How to Get Rid of Sump Pump Odor for Good!

Are you tired of that unpleasant odor coming from your sump pump? Don’t worry, because we’ve got the solution for you! In this article, we’ll show you exactly how to get rid of sump pump odor for good. Whether you’re dealing with a musty smell or a foul sewage odor, our step-by-step guide will help you eliminate it and create a fresh and odor-free environment in your basement.

We understand how frustrating it can be when your sump pump starts emitting unpleasant smells. Not only does it make your basement uncomfortable, but it can also indicate a deeper issue with your sump pump system. That’s why it’s crucial to address the odor problem as soon as possible.

Using our expert tips and proven methods, you’ll be able to identify the cause of the odor and take the necessary steps to eliminate it. From cleaning and disinfecting your sump pump to preventing future odors, we’ve got you covered. Say goodbye to that unpleasant smell and hello to a fresh and clean basement!

Remember, a well-functioning sump pump should not emit any odor. So, let’s dive in and banish that sump pump odor once and for all!

Understanding the causes of sump pump odor

To effectively tackle sump pump odor, it’s important to understand its underlying causes. There can be several reasons why your sump pump is emitting unpleasant smells. One common cause is the presence of stagnant water in the sump pit. When water sits for an extended period, it can develop a musty odor. Another cause could be a faulty or improperly installed sump pump, which can lead to sewage odors.

Additionally, mold and mildew growth can contribute to sump pump odor. These fungi thrive in damp environments and can release a pungent smell. Finally, if your sump pump is constantly running, it may not have enough time to dry out, leading to the growth of bacteria that produce foul odors.

The importance of addressing sump pump odor

Ignoring sump pump odor can have serious consequences. Not only does it make your basement an unpleasant space to be in, but it can also indicate potential issues with your sump pump system. A well-functioning sump pump should not emit any odor, so if you notice a persistent smell, it’s crucial to take action.

Sump pump odor can be a sign of water damage, mold growth, or even a malfunctioning sump pump. These issues can lead to costly repairs and potential health hazards if left unaddressed. By tackling the odor problem early on, you can prevent further damage and ensure the longevity of your sump pump system.

Common DIY methods to eliminate sump pump odor

If you’re looking to tackle sump pump odor on your own, there are several DIY methods you can try. The first step is to inspect and clean the sump pit. Remove any debris, dirt, or standing water from the pit using a shop vacuum or a bucket. It’s important to wear protective gloves and a mask to avoid contact with potentially harmful substances.

Once the pit is clean, you can create a homemade cleaning solution using a mixture of water and bleach. Use a scrub brush to thoroughly clean the pit, ensuring you reach all corners and crevices. After scrubbing, rinse the pit with clean water to remove any remaining bleach residue.

Another effective DIY method is to use vinegar to eliminate sump pump odor. Vinegar is a natural disinfectant that can help neutralize odors. Mix equal parts vinegar and water and pour it into the sump pit. Allow the mixture to sit for a few hours before flushing it out with clean water.

Using natural remedies to get rid of sump pump odor

If you prefer to use natural remedies, there are several options available to you. Baking soda is a versatile and affordable natural deodorizer. Sprinkle baking soda directly into the sump pit to absorb odors. Leave it overnight and then vacuum or sweep it out the next day.

Charcoal is another effective natural remedy for sump pump odor. Place a few pieces of activated charcoal in a mesh bag and hang it near the sump pit. Charcoal has excellent odor-absorbing properties and can help eliminate the unpleasant smell.

You can also use essential oils to mask sump pump odor. Add a few drops of your favorite essential oil, such as lavender or lemon, to a cotton ball and place it near the sump pit. The pleasant scent of the essential oil will help mask any lingering odors.

Professional solutions for sump pump odor removal

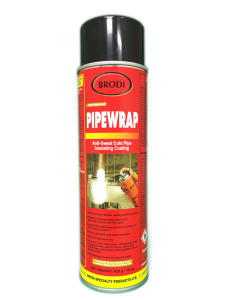
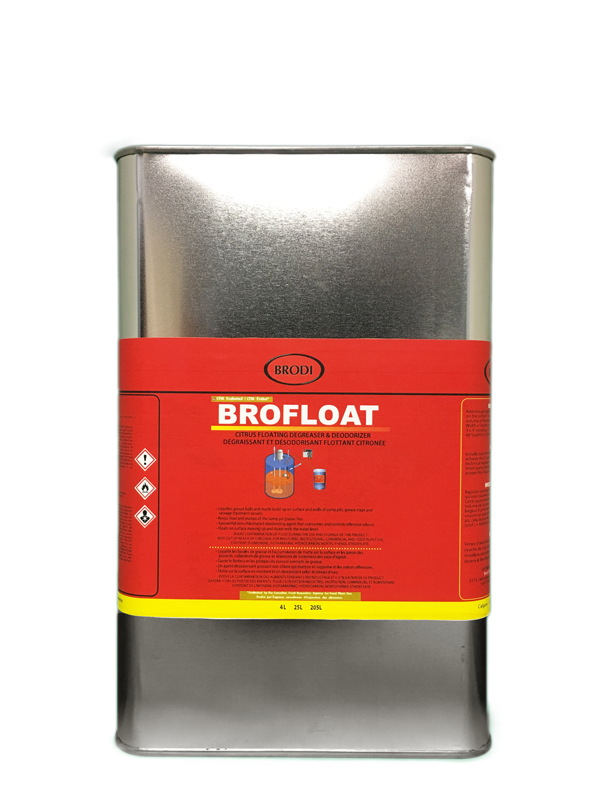
If the DIY methods mentioned above don’t completely eliminate the sump pump odor, it may be time to consider professional solutions. In some cases, a faulty or outdated sump pump may need to be replaced. Additionally, for an effective and eco-friendly solution, consider using Brofloat, a floating citrus-based degreaser and deodorizer. Brofloat is designed to break down and eliminate unpleasant odors in sump pump systems. 

BroFloat

You can learn more about this product and its benefits by clicking here

Brofloat not only neutralizes odors but also helps in maintaining a clean and efficient sump pump system. Its citrus-based formula is environmentally friendly and safe for use in residential spaces. By incorporating Brofloat into your sump pump maintenance routine, you can enjoy a fresher and more pleasant basement environment, ensuring the longevity and effectiveness of your sump pump system.

Preventing sump pump odor in the future

Once you’ve successfully eliminated the sump pump odor, it’s important to take preventive measures to ensure it doesn’t return. Regular maintenance is key to keeping your sump pump system odor-free. Here are a few tips to help you prevent sump pump odor in the future:

1. Check your sump pump regularly for any signs of malfunction or damage. Look for leaks, strange noises, or excessive vibration.

2. Clean the sump pit and remove any debris or standing water on a regular basis.

3. Install a sump pump cover to prevent odors from escaping and to keep out debris and pests.

4. Consider installing a backup sump pump system to ensure continuous operation even during power outages.

5. Keep the surrounding area of the sump pump clean and free from clutter to promote proper air circulation.

By following these preventive measures, you can maintain a fresh and odor-free basement and avoid any future issues with your sump pump system.

Maintaining and cleaning your sump pump to prevent odor

Regular maintenance and cleaning are essential to prevent sump pump odor. Here are some steps you can take to maintain and clean your sump pump:

1. Test your sump pump regularly by pouring water into the pit and ensuring it activates properly.

2. Clean the sump pit at least once a year to remove any debris or sediment that may have accumulated.

3. Inspect the discharge pipe and make sure it is clear of any obstructions or clogs.

4. Check the float switch to ensure it is functioning correctly. This switch is responsible for activating the sump pump when the water level rises.

5. Consider installing a sump pump alarm that will alert you if the water level in the pit becomes too high.

By following these maintenance and cleaning tips, you can extend the lifespan of your sump pump and prevent any unpleasant odors from developing.

Signs of a malfunctioning sump pump that may contribute to odor

Sump pump odor can be an indication of a malfunctioning sump pump. It’s essential to be aware of the signs that your sump pump may not be functioning properly. Here are a few signs to watch out for:

1. Excessive noise: If your sump pump is making loud or unusual noises, it may be a sign of a mechanical issue.

2. Constant running: A sump pump that is constantly running even when there is no significant water accumulation may indicate a problem with the float switch or the pump itself.

3. Inconsistent operation: If your sump pump fails to activate when water levels rise or if it turns on and off frequently, it may be a sign of a malfunctioning float switch.

4. Visible leaks: Any signs of water leakage around the sump pump or the discharge pipe could be an indication of a faulty seal or a cracked pump housing.

If you notice any of these signs, it’s important to address the issue promptly to prevent further damage and potential odor problems.

Frequently asked questions about sump pump odor

1. Can a sump pump emit a foul sewage smell?

Yes, a foul sewage smell can indicate a problem with your sump pump system, such as a malfunctioning check valve or a broken sewer line.

2. How often should I clean my sump pump?

It’s recommended to clean your sump pump at least once a year to prevent odors and ensure optimal performance.

3. Can mold and mildew cause sump pump odor?

Yes, mold and mildew growth can contribute to sump pump odor. It’s important to address any signs of mold or mildew promptly.

4. Why is my sump pump constantly running?

A sump pump that is constantly running may indicate a problem with the float switch or a high water table in your area.

5. How long does a sump pump typically last?

The lifespan of a sump pump can vary depending on various factors, but on average, a sump pump can last anywhere from 7 to 10 years.

Conclusion: Enjoying a fresh and odor-free basement with a properly functioning sump pump

In conclusion, sump pump odor is a common issue that can be easily addressed with the right knowledge and tools. By understanding the causes of sump pump odor and taking preventive measures, you can enjoy a fresh and odor-free basement.

Remember, regular maintenance, cleaning, and inspection are essential to ensure your sump pump operates efficiently and keeps your basement dry and odor-free. If DIY methods don’t completely eliminate the odor, don’t hesitate to seek professional help to address any underlying issues with your sump pump system.

Say goodbye to that unpleasant smell and hello to a fresh and clean basement! With our expert tips and proven methods, you can banish sump pump odor for good and create a comfortable living space that you and your family can enjoy.

How to choose the right RTV silicone for your application

When it comes to choosing the right RTV silicone for your specific application, there are several factors to consider. Selecting the appropriate silicone sealant is crucial to ensure the effectiveness and longevity of your project. Whether you are working on sealing windows, repairing leaks, or creating strong bonds, finding the right product for the job is essential.

In this article, we will guide you through the process of choosing the perfect RTV silicone for your application. We will cover the different types of silicone sealants available, their uses, and the key factors to consider when making your selection. Whether you are a professional contractor or a DIY enthusiast, this comprehensive guide will provide you with the knowledge and insights you need to make an informed decision.

With a wide range of options on the market, it can be overwhelming to find the right product that meets your specific requirements. That’s why we are here to help you navigate through the multitude of choices and find the perfect RTV silicone sealant for your next project. Let’s get started!

Understanding the different types of RTV silicone

When it comes to RTV (Room Temperature Vulcanizing) silicone, there are several different types available, each with its own unique properties and applications. Understanding the differences between these types will help you make an informed decision.

1. Acetoxy Cure Silicone: This type of silicone is commonly used for general-purpose applications. It releases acetic acid as it cures, which gives off a vinegar-like smell. Acetoxy cure silicone is known for its excellent adhesion properties and is often used for sealing windows, doors, and other exterior applications.

2. Neutral Cure Silicone: Unlike acetoxy cure silicone, neutral cure silicone does not release any corrosive byproducts during the curing process. This makes it ideal for use on sensitive materials such as metals, plastics, and electronics. Neutral cure silicone is often used in applications where non-corrosive properties are essential, such as in the automotive and electronics industries.

3. Alkoxy Cure Silicone: Alkoxy cure silicone is a versatile option that offers good adhesion properties and excellent resistance to weathering and aging. It is commonly used for sealing and bonding applications in construction, automotive, and marine industries. Alkoxy cure silicone is known for its durability and long-lasting performance.

Factors to consider when choosing RTV silicone for your application

Now that you have an understanding of the different types of RTV silicone available, let’s dive into the key factors you should consider when choosing the right silicone sealant for your application.

Temperature resistance and performance characteristics

One of the most important factors to consider is the temperature resistance of the silicone sealant. Different applications require different levels of resistance to heat, cold, and extreme weather conditions. Make sure to check the product specifications for the temperature range in which the silicone can effectively perform.

Additionally, consider the performance characteristics of the silicone sealant. Does it offer good flexibility? Is it resistant to UV radiation? Does it provide excellent adhesion to the materials you are working with? These performance characteristics will determine how well the silicone sealant will perform in your specific application.

Adhesion and compatibility with different materials

Another crucial factor to consider is the adhesion and compatibility of the silicone sealant with the materials you will be working with. Whether you are bonding metal, glass, plastic, or other substrates, it is essential to choose a silicone sealant that offers excellent adhesion to ensure a strong and durable bond.

Different silicone sealants have different adhesive properties, so make sure to choose one that is specifically designed for the materials you are working with. Some silicone sealants are suitable for a wide range of materials, while others are formulated for specific substrates.

Curing time and flexibility

The curing time of the silicone sealant is an important consideration, especially if you have time constraints or need to complete your project quickly. Some silicone sealants cure within a few hours, while others may take longer. Make sure to check the curing time specified by the manufacturer and choose a product that aligns with your project timeline.

Flexibility is another factor to consider, especially if you are working on applications that require movement or expansion and contraction. Silicone sealants with good flexibility will be able to withstand these movements without cracking or losing their effectiveness.

Application methods and ease of use

Consider the application methods and ease of use when choosing your RTV silicone sealant. Some silicone sealants come in cartridges that can be easily applied using a caulking gun, while others are available in squeeze tubes or containers. Choose a product that suits your preferred application method and is easy to handle.

Additionally, consider the ease of cleanup and the availability of any necessary tools or accessories for application. Some silicone sealants require the use of primers or specialized tools, so make sure to factor in these requirements when making your selection.

Safety considerations and certifications

Safety should always be a top priority when working with any type of chemical product, including silicone sealants. Look for silicone sealants that have been tested and certified for their safety and compliance with relevant industry standards. This will ensure that you are using a product that is safe for both you and the environment.

Pay attention to any safety precautions or recommendations provided by the manufacturer, such as wearing protective gloves or working in a well-ventilated area. Following these guidelines will help ensure a safe and successful application.

Unlocking Seamless Sealing Solutions with Brodi’s BroGasket Silicone Gasket Maker 

One of the standout features of the BroGasket Silicone Gasket Maker is its versatility. Whether you’re working on your car, plumbing, or any other project that requires a reliable seal, this product has you covered. Its advanced formula ensures compatibility with a wide range of materials, including metal, plastic, rubber, and more. This versatility makes it a go-to solution for various sealing needs.

Easy Application:

Gone are the days of struggling with messy gasket application. BroGasket Silicone Gasket Maker simplifies the process with its user-friendly design. The product comes in a convenient tube with an easy-to-use applicator, allowing for precise application without the need for additional tools. This ease of use makes it accessible for both seasoned professionals and DIY enthusiasts.

Durable and Long-Lasting:

Durability is a key factor when it comes to gasket makers, and BroGasket exceeds expectations. The silicone-based formula creates a durable and long-lasting seal that can withstand temperature variations, vibrations, and exposure to various fluids. Whether you’re dealing with extreme heat under the hood of your car or the constant flow of water in plumbing applications, BroGasket ensures a reliable and robust seal.

Versatile Temperature Resistance:

One of the remarkable qualities of BroGasket Silicone Gasket Maker is its impressive temperature resistance. Able to withstand both high and low temperatures, this gasket maker remains effective in environments where other sealants may fail. This makes it an ideal choice for applications in engines, exhaust systems, and other areas exposed to extreme temperature fluctuations.

In the world of gasket makers, Brodi’s BroGasket Silicone Gasket Maker stands out as a reliable, versatile, and user-friendly solution. Whether you’re tackling automotive repairs, plumbing projects, or general household maintenance, this product delivers a seamless and durable seal. With its easy application, impressive temperature resistance, and positive customer feedback, BroGasket is a must-have in any toolkit. Upgrade your sealing game with Brodi’s innovative silicone gasket maker – the key to unlocking hassle-free and effective seals.

Conclusion and final tips for choosing the right RTV silicone

Choosing the right RTV silicone for your application is crucial to the success of your project. By considering factors such as temperature resistance, adhesion, curing time, and ease of use, you can ensure that you are selecting a silicone sealant that meets your specific requirements.

Additionally, make sure to choose a silicone sealant from a reputable brand that offers high-quality products and has a proven track record in the industry. Reading customer reviews and seeking recommendations can also help you make an informed decision.

Remember to always follow the manufacturer’s instructions and safety guidelines when working with RTV silicone sealants. By taking the time to choose the right product and following proper application techniques, you can achieve a professional-quality result that will stand the test of time.

So, the next time you are faced with the task of choosing an RTV silicone sealant, refer back to this guide and make an informed decision!

Revolutionizing Grease Trap Maintenance: Unleashing the Power of Bac-Treet vs. Manual Bacterial Treatment

Are you tired of dealing with clogged drains and foul odors caused by grease buildup in your grease trap? We have the perfect solution for you! 

Introducing Bac-Treet, the revolutionary bacterial treatment specifically designed to revolutionize grease trap maintenance. With its powerful and efficient formula, Bac-Treet is set to transform the way grease traps are maintained, leaving no trace of grease buildup behind.

Revolutionizing Grease Trap Maintenance

Unlike manual bacterial treatments, Bac-Treet utilizes a highly active blend of specially selected microbes that quickly break down fats, oils, and grease (FOG) in your grease trap. This cutting-edge technology ensures that your grease trap remains clean and odor-free, preventing costly blockages and potential health hazards.

Bac-Treet is easy to use, requiring no special equipment or training. Simply add the treatment directly into your grease trap, and let the powerful bacteria work their magic. Experience the power of ATC Bac-Treet and wave goodbye to grease trap maintenance headaches forever. Say hello to a clean and efficient grease trap with Bac-Treet. Try it today and see the difference for yourself.

Understanding The Limitations of Manual Bacterial Treatment

Maintaining a clean and efficient grease trap is essential for any establishment that deals with grease and oil on a regular basis. Grease traps are designed to capture and separate fats, oils, and grease from wastewater, preventing them from entering the sewage system and causing blockages. However, over time, grease can accumulate in the trap, leading to clogged drains, foul odors, and potential health hazards.

Proper maintenance of grease traps ensures that they function effectively, preventing costly repairs and disruptions to your business. Regularly cleaning and treating your grease trap not only extends its lifespan but also helps maintain a hygienic and odor-free environment. Neglecting grease trap maintenance can result in expensive plumbing repairs, fines from regulatory authorities, and a negative impact on your business’s reputation.

Introducing The Bac-Treet Starter Pack and Its Benefits

Traditional manual bacterial treatments have long been used to break down grease in grease traps. These treatments typically involve adding bacteria or enzymes to the grease trap, hoping that they will digest the fats, oils, and grease over time. While manual treatments can be effective to some extent, they often have limitations that can hinder their overall performance.

One of the main limitations of manual bacterial treatments is the lack of control over the types and quantities of bacteria introduced into the grease trap. Different bacteria have varying capabilities to break down grease, and using the wrong strains or insufficient quantities may result in suboptimal performance. Additionally, manual treatments may require frequent reapplications to maintain effectiveness, leading to additional costs and effort.

Another drawback of manual treatments is the time it takes for the bacteria to break down the grease. Manual treatments often require extended periods of time to fully digest the fats, oils, and grease in the trap, leaving room for potential buildup and blockages. This can lead to unpleasant odors, clogged drains, and increased maintenance requirements.

How Bac-Treet Revolutionizes Grease Trap Maintenance

Bac-Treet Starter Pack is a game-changer in grease trap maintenance. Unlike traditional manual bacterial treatments, Bac-Treet utilizes a highly active blend of specially selected microbes that are specifically designed to target and break down fats, oils, and grease in grease traps. This advanced formula ensures rapid and efficient digestion of grease, eliminating the need for prolonged treatment periods.

The key benefit of Bac-Treet is its ability to prevent grease buildup and minimize the risk of clogged drains and foul odors. By introducing powerful bacteria into the grease trap, Bac-Treet quickly breaks down even the toughest grease deposits, leaving your grease trap clean and odor-free. This not only improves the overall functionality of the grease trap but also enhances the hygiene and cleanliness of your establishment.

Another advantage of Bac-Treet is its ease of use. Unlike manual bacterial treatments that may require specialized equipment or training, Bac-Treet can be easily applied directly into the grease trap. Simply follow the instructions provided, and let the powerful bacteria do their work. This simplicity saves you time and effort, allowing you to focus on other aspects of your business.

Step-by-step Guide to Using Bac-Treet for Grease Trap Maintenance

Using Bac-Treet for grease trap maintenance is simple and straightforward. Follow these step-by-step instructions to ensure optimal results:

Installation: Open the BAC TREET device and insert the provided batteries. Securely place the unit in proximity to the grease trap or drainage area.

Feeder Hoses: Route and install feeder hoses as per directions. 

Activation: Turn on the device and set the frequency required. activate the bacterial treatment. The system will release a controlled dose of bacteria into the grease trap at regular intervals.

Routine Maintenance: For optimal results, maintain a consistent treatment schedule based on the manufacturer’s recommendations. Regular use ensures continuous bacterial activity.

Monitoring: Monitor the device’s indicator lights to track battery life and bacterial treatment levels. Replace batteries as needed, and refill the bacterial solution according to the product guidelines.

Refill Process: When the bacterial solution is depleted, follow the easy refill process provided with the BAC TREET Starter Pack. This typically involves adding a new bacterial cartridge or solution container.

By following these simple steps, you can effectively maintain your grease trap and experience the full benefits of ATC Bac-Treet.

Comparing The Costs and Effectiveness of Manual Bacterial Treatment VS. Bac-Treet

When considering grease trap maintenance options, it is important to compare the costs and effectiveness of manual bacterial treatment and Bac-Treet. While manual treatments may initially seem more affordable, the long-term costs and benefits need to be taken into account.

Manual treatments often require frequent reapplications to maintain effectiveness. This can lead to additional costs in terms of purchasing bacterial products and investing time in the application process. Additionally, the extended treatment periods of manual treatments may result in increased maintenance requirements and potential business disruptions.

On the other hand, Bac-Treet offers a cost-effective and efficient solution. The powerful formula of Bac-Treet ensures rapid and thorough grease digestion, reducing the need for frequent reapplications. This saves you time, effort, and money in the long run. Furthermore, the prevention of clogged drains and foul odors through the use of Bac-Treet minimizes the risk of costly plumbing repairs and potential fines.

When considering the overall effectiveness and cost-efficiency, Bac-Treet proves to be a superior choice for grease trap maintenance.

Ready to experience the power of Bac-Treet for yourself? You can purchase Bac-Treet by clicking here

The Ultimate Guide to Auto Undercoating: Why It’s Essential for Every Car Owner

As a responsible car owner, keeping your vehicle in top-notch condition should be a top priority. One important aspect of car maintenance that often gets overlooked is auto undercoating. This ultimate guide will shed light on why auto undercoating is essential and why every car owner should consider it.

Auto undercoating serves as a protective layer between your car’s body and the road. It shields your vehicle from various elements such as moisture, salt, gravel, and other debris that can cause rust and corrosion. By preventing these damaging elements from reaching the vulnerable areas of your car, undercoating can significantly extend the life of your vehicle.

Not only does undercoating protect against corrosion, but it also helps reduce road noise and vibrations, making for a smoother and quieter ride. Additionally, it can act as an added layer of insulation, helping to keep your car’s interior cooler during the hot summer months and warmer during the winter.

In this comprehensive guide, we will explore the different types of undercoating, the benefits they offer, and the best practices for applying undercoating to your car. Don’t neglect this important step in car maintenance. Read on to discover why auto undercoating is essential for every car owner.

The Importance of Auto Undercoating

Auto undercoating refers to the process of applying a protective coating to the underside of a car. It involves spraying a layer of specialized material onto the exposed metal surfaces, such as the chassis, floor pans, and wheel wells. This coating acts as a barrier that prevents moisture, salt, and other corrosive substances from coming into direct contact with the metal, reducing the risk of rust and corrosion.

Undercoating can be done using various materials, including rubberized coatings, asphalt-based coatings, and wax-based coatings. The choice of undercoating material depends on factors such as the climate in which you live, the type of driving you do, and personal preference.

Benefits of Auto Undercoating

Auto undercoating is crucial for maintaining the structural integrity and longevity of your car. The underside of a vehicle is constantly exposed to harsh elements, such as road salt, gravel, and moisture. Over time, these elements can cause corrosion, leading to rust and deterioration of the metal components.

By applying an undercoating, you create a protective barrier that prevents these elements from reaching the vulnerable areas of your car. This significantly reduces the risk of rust and corrosion, prolonging the lifespan of your vehicle.

Furthermore, undercoating helps to reduce road noise and vibrations. The coating acts as a sound-dampening barrier, absorbing the noise generated by the tires and the road surface. This results in a quieter and more comfortable ride, especially on rough roads or highways.

Additionally, undercoating can provide insulation benefits. It helps to keep your car’s interior cooler during hot summer months by reflecting heat away from the underside of the vehicle. In colder climates, undercoating acts as an added layer of insulation, helping to retain heat and keep the interior warmer.

1. Corrosion Prevention with Proflex: One of the key advantages of utilizing auto undercoating, particularly with products like Proflex, is its effective corrosion protection. By establishing a protective barrier that shields the vehicle’s metal surfaces from corrosive elements, Proflex undercoating markedly diminishes the likelihood of rust and deterioration.

2. Extended lifespan: With proper undercoating, you can significantly extend the lifespan of your vehicle. By preventing rust and corrosion, you ensure that the structural integrity of your car remains intact, allowing it to withstand the test of time.

3. Reduced maintenance costs: Rust and corrosion can lead to costly repairs and replacements. By investing in undercoating, you can minimize the need for expensive repairs, saving you money in the long run.

4. Improved resale value: A well-maintained car with a solid undercoating can fetch a higher resale value. Prospective buyers will appreciate the added protection against rust and corrosion, making your vehicle more desirable in the used car market.

5. Enhanced driving experience: Undercoating helps to reduce road noise and vibrations, resulting in a smoother and quieter ride. This can make your driving experience more enjoyable, especially on long trips or rough roads.

Common Misconceptions about Auto Undercoating

1. New cars don’t need undercoating: While new cars often come with some form of factory undercoating, it may not provide sufficient protection in certain climates or driving conditions. Adding an additional layer of undercoating can provide extra protection and peace of mind.

2. Undercoating is only for off-road vehicles: Undercoating is beneficial for all types of vehicles, not just off-road ones. Any car exposed to harsh elements can benefit from the added protection against rust and corrosion.

3. Undercoating is a one-time treatment: Undercoating is not a one-time treatment. Over time, the undercoating can wear off, especially in regions with extreme weather conditions or where road salt is used. Regular inspections and reapplication may be necessary to maintain the protective barrier.

4. Undercoating is expensive: The cost of undercoating varies depending on the type of material used and whether you choose to do it yourself or hire a professional. However, the cost of undercoating is minimal compared to potential repair costs caused by rust and corrosion.

5. Undercoating is only for older cars: While older cars are more prone to rust and corrosion, undercoating is beneficial for both new and old vehicles. It helps protect against the damaging effects of moisture, salt, and other corrosive substances, regardless of the age of the car.

Types of Undercoating Materials

1. Rubberized coatings: Rubberized undercoatings are popular due to their durability and flexibility. They provide excellent protection against moisture, salt, and debris. Rubberized coatings also offer sound-dampening properties, reducing road noise.

2. Asphalt-based coatings: Asphalt-based undercoatings are known for their excellent rust and corrosion resistance. They provide a thick, protective layer that adheres well to the metal surfaces. However, asphalt-based coatings can be more challenging to apply and may require professional assistance.

3. Wax-based coatings: Wax-based undercoatings offer a more affordable option and are relatively easy to apply. They provide a protective barrier against moisture and salt. However, wax-based coatings may not be as durable as rubberized or asphalt-based options and may require more frequent reapplication.

Steps to Undercoat Your Car

1. Prepare the vehicle: Thoroughly clean the underside of your car to remove any dirt, debris, or rust. It is crucial to start with a clean surface to ensure proper adhesion of the undercoating material.

2. Choose the undercoating material: Select the type of undercoating material that best suits your needs and climate. Consider factors such as durability, sound-dampening properties, and ease of application.

3. Apply the undercoating: Follow the manufacturer’s instructions for applying the chosen undercoating material. Use a spray gun or brush to apply an even layer to the exposed metal surfaces. Pay close attention to areas prone to rust, such as the wheel wells and chassis.

4. Allow the undercoating to dry: Give the undercoating sufficient time to dry and cure before driving the vehicle. This ensures proper adhesion and effectiveness of the protective barrier.

5. Inspect and maintain: Regularly inspect the undercoating for any signs of wear or damage. Touch up or reapply the undercoating as necessary to maintain its protective properties.

When to Undercoat Your Car 

The best time to undercoat your car is before the onset of harsh weather conditions, such as winter or rainy seasons. Applying undercoating in advance ensures that your vehicle is well-protected before it faces the elements. However, undercoating can be done at any time, even on older vehicles, to provide an added layer of protection against rust and corrosion.

How to Choose the Right Undercoating Service

The best time to undercoat your car is before the onset of harsh weather conditions, such as winter or rainy seasons. Applying undercoating in advance ensures that your vehicle is well-protected before it faces the elements. However, undercoating can be done at any time, even on older vehicles, to provide an added layer of protection against rust and corrosion.

DIY vs Professional Undercoating

If you prefer to leave undercoating to the professionals, choosing the right undercoating service is crucial. Consider the following factors when selecting a service provider:

1. Experience and reputation: Look for a service provider with a proven track record and positive reviews from satisfied customers. Experience in undercoating different types of vehicles and knowledge of various undercoating materials are essential.

2. Quality of materials: Ensure that the service provider uses high-quality undercoating materials that offer long-lasting protection against rust and corrosion. Ask about the specific products they use and their effectiveness.

3. Application process: Inquire about the application process used by the service provider. The application should be thorough, covering all exposed metal surfaces, including hard-to-reach areas.

4. Warranty and guarantees: Check if the service provider offers any warranties or guarantees on their undercoating work. A reputable provider should stand behind their work and offer assurance that the undercoating will provide the intended protection.

Deciding between a DIY undercoating or hiring a professional service depends on various factors, such as your level of expertise, available time, and budget. Here are some considerations:

DIY undercoating:

– Pros: Cost-effective, allows customization, can be done at your convenience.

– Cons: Requires proper knowledge and skills, may not provide the same level of protection as professional application, time-consuming.

Professional undercoating:

– Pros: Expert application, use of specialized equipment, provides peace of mind, saves time.

– Cons: Higher cost, limited customization options.

Consider your abilities, resources, and priorities when deciding which approach is best for you.

Conclusion

Auto undercoating emerges as a crucial investment for every car owner. Safeguard your vehicle against corrosion, enhance its longevity, and ensure a smoother ride for years to come. With our ultimate guide, you’re equipped to make informed decisions that protect your automotive investment. Embrace the power of undercoating, and let your car journey withstand the test of time.

Pipe wrap: Everything You Need to Know About Protecting Your Pipes

Pipes are the unsung heroes of our homes and buildings, carrying water, gas, and other essential utilities to every corner. However, these vital components are often out of sight and out of mind until a problem arises. One of the best ways to ensure the longevity and functionality of your pipes is by using pipewrap, a simple yet highly effective solution. In this comprehensive guide, we will delve deep into the world of pipewrap, exploring its importance, types, installation methods, and the benefits it offers. By the end of this article, you’ll have a thorough understanding of how pipewrap can protect your pipes and save you from potential disasters.

What are the benefits of insulation on pipes? 

Using pipe wrap offers a multitude of benefits, making it a wise investment for homeowners and businesses alike:

Prevents Corrosion: Pipewrap acts as a barrier against moisture, preventing corrosion and extending the lifespan of the pipes.

Energy Efficiency: Properly insulated pipes lead to reduced heat loss, improving energy efficiency in heating systems and lowering utility bills.

Prevents Freezing: In cold climates, pipewrap prevents pipes from freezing by providing insulation against low temperatures.

Reduces Condensation: Insulated pipes are less prone to condensation, preventing water damage and mold growth.

Enhances Safety: Insulated pipes are less likely to burst or leak, reducing the risk of water damage and potential accidents.

Saves Money: By preventing pipe damage and increasing energy efficiency, pipe wrap ultimately saves homeowners and businesses money on repairs and utility bills.

Understanding Pipewrap Types is Essential for Property Owners

The growing importance of pipe insulation in modern construction cannot be overstated, especially in an era where energy efficiency and sustainability are paramount. Properly insulated pipes significantly contribute to conserving energy, reducing heat loss, and cutting down utility costs. For property owners, understanding the different types of pipewrap is essential. Each type, whether it’s fiberglass, foam, rubber, aluminum foil, or PVC, offers distinct advantages and is tailored for specific applications. Having a comprehensive knowledge of these materials empowers property owners to make informed choices that align with their specific needs and environmental conditions. By selecting the right pipewrap type, property owners not only protect their investments by ensuring the longevity and functionality of their pipes but also actively contribute to a greener and more energy-efficient future. In a world where environmental consciousness and economic prudence go hand in hand, understanding pipewrap types has become a fundamental aspect of responsible property ownership.

Different Types of Pipe Insulation

Pipewrap, also known as pipe insulation wrap or pipe wrap tape, is a protective covering that shields pipes from external elements. It comes in various types, each designed to cater to specific needs:

Fiberglass Pipewrap: Fiberglass pipewrap is lightweight and offers excellent thermal insulation. It is resistant to moisture, chemicals, and high temperatures, making it suitable for both indoor and outdoor use.

Foam Pipewrap: Foam pipe insulators is easy to install and provides good insulation properties. It is particularly effective in preventing condensation on pipes carrying cold water.

Rubber Pipewrap: Rubber pipewrap is highly flexible and resistant to moisture, making it ideal for pipes in damp or wet environments. It is also durable and can withstand extreme weather conditions.

Aluminum Foil Pipewrap: Aluminum foil pipewrap reflects heat and provides insulation. It is often used in HVAC systems to enhance energy efficiency.

PVC Pipewrap: PVC pipewrap is resistant to chemicals and offers excellent protection against corrosion. It is commonly used in industrial settings where pipes are exposed to harsh substances.

Insulation pipe wrap: A Step-by-Step Guide

Insulation for pipes is a relatively straightforward process that can be done by homeowners or professionals. Here’s a step-by-step guide to help you install pipewrap effectively:

Prepare the Surface: Ensure the pipes are clean and dry before applying insulate pipes. Remove any dirt, rust, or old insulation material.

Measure and Cut: Measure the length of the pipe and cut the pipewrap material accordingly. It’s essential to have a snug fit to maximize insulation effectiveness.

Apply Adhesive (If Required): Some pipewrap materials come with adhesive backing. If your insulating pipes requires adhesive, remove the protective covering and wrap the material tightly around the pipe, pressing firmly to secure it in place.

Overlap Properly: If you are using tape-style pipewrap, ensure that each pipe wrap around overlaps the previous one by at least half its width. This prevents gaps and ensures uniform insulation.

Secure the Ends: Use additional tape or adhesive to secure the ends of the pipewrap, ensuring there are no openings where moisture or air can seep in.

Inspect and Repair: After insulation pipe wrap, inspect the wrapped pipes for any gaps or loose sections. If you find any issues, repair them immediately to maintain the integrity of the insulation.

Troubleshooting Pipewrap Installations: Ensuring a Seamless Shield for Your Pipes

Wrapping pipe insulation can significantly enhance the durability and efficiency of your plumbing system, occasional issues may arise during or after the process. Identifying and addressing these problems promptly is crucial to ensuring your pipes remain well-protected. We will explore common installation mistakes, signs of poorly installed pipewrap, and handy DIY repair tips to troubleshoot any minor problems that might occur.

A. Common Installation Mistakes: How to Avoid Them

  • Incomplete Surface Preparation:

Mistake: Inadequate cleaning before installation can hinder the pipewrap’s adhesion.

Solution: Thoroughly clean and dry the pipes before applying the pipewrap to ensure proper bonding.

  • Incorrect Overlapping:

Mistake: Incorrect overlapping can create gaps in the insulation, reducing its effectiveness.

Solution: Follow the manufacturer’s guidelines regarding overlapping to ensure a snug fit without gaps.

  • Insufficient Adhesive Application:

Mistake: Insufficient adhesive application can lead to loose pipewrap, reducing its protective capabilities.

Solution: Apply adhesive evenly, following the instructions provided, and firmly press the wrap in place for secure adhesion.

B. Signs of Poorly Installed Pipewrap: Identifying Issues Early

  • Visible Gaps or Loose Ends:

Issue: Gaps or loose ends indicate improper installation, compromising insulation.

Solution: Reapply pipewrap to cover gaps and secure loose ends, ensuring a seamless fit.

  • Condensation Buildup:

Issue: Condensation forming on pipes suggests inadequate insulation, allowing temperature fluctuations.

Solution: Reinforce the insulation by adding an extra layer of pipewrap, especially in areas prone to condensation.

  • Deterioration or Mold Growth:

Issue: Deterioration or mold growth under the pipewrap signifies moisture infiltration.

Solution: Remove the damaged section, address the underlying issue causing moisture, and reinstall pipewrap properly.

C. DIY Repair Tips: Fixing Minor Problems with Pipewrap

  • Patchwork Repair:

Issue: Small tears or damages in the pipewrap.

Solution: Use compatible patching material to cover the damaged area, ensuring airtight sealing.

  • Reinforcement with Tape:

Issue: Loose pipewrap or gaps in insulation.

Solution: Use specialized pipewrap tape to reinforce loose sections and seal gaps, enhancing overall insulation.

  • Regular Inspection and Maintenance:

Issue: Potential wear and tear over time.

Solution: Regularly inspect pipewrap for signs of damage, and conduct minor repairs promptly to prevent issues from escalating.

Comparison of Pipe wrap Insulation: Pros and Cons

In the world of pipewrap materials, choosing the right one is pivotal for ensuring the longevity and efficiency of your plumbing system. With options like fiberglass, foam, rubber, aluminum foil, spray pipe insulation, and PVC pipewrap available, it’s essential to understand their pros and cons. In this comprehensive guide, we will delve deep into the strengths and weaknesses of each material, helping you make an informed decision tailored to your specific needs. Additionally, we will explore real-life testimonials, providing firsthand insights into users’ experiences with different pipewrap types.

A. Analyzing Fiberglass, Foam, Rubber, Aluminum Foil, and PVC Pipewrap

1. Fiberglass Pipewrap:

Pros: Lightweight, excellent thermal insulation, resistant to moisture and chemicals.

Cons: Fragile, may require additional protective layer in harsh environments.

2. Foam Pipewrap:

Pros: Easy to install, good insulation properties, effective against condensation.

Cons: Less durable than other materials, may compress over time.

3. Rubber Pipewrap:

Pros: Highly flexible, moisture-resistant, durable, suitable for damp environments.

Cons: Vulnerable to extreme temperatures, may degrade over time.

4. Aluminum Foil Pipewrap:

Pros: Reflects heat, enhances energy efficiency, resistant to moisture.

Cons: Prone to tearing, may require careful handling during installation.

5. PVC Pipewrap:

Pros: Chemical-resistant, protects against corrosion, durable.

Cons: Less flexible than rubber, may crack in very low temperatures.

B. Which Pipe Wrapping Insulation is Ideal for Your Specific Needs?

Choosing the right pipewrap material depends on your unique requirements. For instance, if you’re dealing with a damp environment, rubber pipewrap’s moisture resistance might be invaluable. In areas with extreme temperature fluctuations, fiberglass or foam pipewrap could be preferable due to their excellent thermal insulation properties. Evaluate your specific situation, considering factors like temperature, moisture, and potential wear and tear, to determine the most suitable material for your pipes.

C. Real-Life Testimonials: Users’ Experiences with Different Pipewrap Types

Real-life testimonials provide invaluable insights into the practical aspects of pipewrap materials. Users’ experiences reveal the ease of installation, long-term durability, and ability to withstand varying conditions.

Sarah, a homeowner from New York, shares, “We opted for foam pipewrap, and it made a significant difference in our utility bills. The insulation was easy to install, and even in the freezing winter, our pipes remained warm, preventing any potential issues.”

John, a facilities manager, adds, “In our industrial setting, we found rubber pipewrap to be a lifesaver. Its flexibility allowed us to cover even the most complex pipes, ensuring long-lasting protection against moisture and wear.”

Why Pipe Protection is Crucial: Safeguarding the Lifelines of Your Home

Pipes, the silent heroes of our homes, play a crucial role in our daily lives, ensuring the smooth flow of water, gas, and other essentials. However, these vital conduits often operate unnoticed until a problem arises. Protecting them is not just a matter of convenience; it’s a necessity. The reasons why pipe protection is absolutely crucial, exploring common threats that pipes face and the dire consequences of neglecting their maintenance.

A. Common Threats to Pipes: Corrosion, Physical Damage, and Temperature Fluctuations

1. Corrosion:

Pipes are vulnerable to corrosion, especially in regions with hard water. Over time, this natural process weakens the pipes, leading to leaks and reduced efficiency.

2. Physical Damage:

Whether due to accidental impacts during construction or natural disasters, physical damage can compromise the structural integrity of pipes, making them prone to sudden failures.

3. Temperature Fluctuations:

Extreme temperatures can cause pipes to expand and contract, stressing their materials. This strain can weaken joints and connections, increasing the risk of leaks.

B. Consequences of Neglect: Repair Costs, Water Wastage, and Safety Hazards

1. Repair Costs:

Neglected pipes are a disaster waiting to happen. The longer the issues persist, the more extensive the damage becomes, leading to costly repairs. Timely protection can prevent these expenses.

2. Water Wastage:

Leaking pipes waste an enormous amount of water. In a world facing water scarcity, these precious resources should not be squandered. Protecting pipes prevents unnecessary wastage.

3. Safety Hazards:

Damaged pipes can lead to a variety of safety hazards, including water damage to your property’s structure, electrical issues, and even the growth of hazardous molds. These dangers can be avoided through proactive pipe protection measures.

Environmental Considerations: Eco-Friendly wrap for pipes Solutions

In the realm of environmental considerations and eco-friendly pipe protection solutions, Brodi Pipewrap stands out with its innovative spray-on anti-sweat insulating coating. Designed to address the challenges posed by intricate plumbing installations, this advanced solution goes beyond conventional methods. 

Pipewrap

By preventing condensation buildup, Brodi Pipewrap not only ensures the integrity of the pipes but also contributes significantly to environmental conservation. The spray-on application not only covers even the most complex pipe configurations effectively but also minimizes material wastage, aligning with sustainable practices. In an era where environmental consciousness is paramount, Brodi Pipewrap’s eco-friendly approach not only ensures the durability of plumbing systems but also reflects a commitment to reducing the overall environmental impact of pipe protection methods.

Conclusion

In conclusion, pipewrap is a cost-effective and practical solution for protecting your pipes from various threats. Whether you are a homeowner, a business owner, or an industrial manager, investing in high-quality pipewrap can safeguard your infrastructure, enhance efficiency, and save you money in the long run. By understanding the types of pipewrap available, the installation process, and the benefits it offers, you can make an informed decision to ensure the longevity and functionality of your pipes. Don’t wait for a pipe disaster to strike; take proactive measures today and wrap your pipes for a secure and worry-free future.

5 in 1 Anti-corrosion Spray to Protect Metal and Electronic Parts

Though 5 in 1 has over five great uses we thought we would highlight how well it works when it comes to corrosion. Corrosion can damage metal and electronic parts and put a snag in your day. Whether you are a professional electrician or manage a large building operation, no matter how careful you are, you cannot avoid rust damage. All it takes is a bit of moisture for rust to form, causing expensive, sometimes irreparable, damage to your valuable equipment and fixtures.

What if I told you that there’s a way to avoid all that!

Spray directly on live bulbs to avoid breaking due to corroded sockets.

Brodi 5 in 1 can help you save time, money, and frustration by rejuvenating rusted parts and lubricating stuck hardware.

Let’s take a closer look at what this product can do for your business.

5 in 1 All-purpose Rust and Corrosion Prevention

Don’t let a freak storm or a leak ruin your expensive equipment, and say goodbye to long hours of prying rusted bolts and nuts apart. Simply douse the corroded parts in 5 in 1 to get rid of the rust. The spray locks the moisture out and works as a lubricant separating the bolts and fasteners easily. 5 in 1 is a multifunctional product which:

  • Removes moisture that causes equipment failure
  • Can be sprayed on live electrical equipment
  • Waterproofs metal surface to reduce corrosion and resist rust
  • Blocks electrical discharge on electronic components for added safety
  • Safe for multiple materials such as rubber, paint, and plastic
  • Repels dirt and grime on stored parts

Applications

From squeaky doors to generators, you can waterproof and rustproof any component of appliances, tools, and hardware encountered in your business.

Use 5 in 1 to treat the following parts:

  • Nuts and bolts
  • Tools
  • Door hinges and locks
  • Chains
  • Cables
  • Metal doors
  • Automotive parts
  • Lawn equipment
  • Equipment storage

This innovative product is convenient to use in :

Building Operations and Maintenance

Whether it’s a school or a hospital, managing a building to keep it running smoothly can be challenging. 5 in 1 helps the building operators to save valuable time and money during routine maintenance tasks, thanks to its fast-acting formula. For example, sometimes even the simple task of changing a light bulb can become a nuisance if it breaks while unscrewing due to rust damage. With 5 in 1, corroded sockets become a dim memory. Building operators can spray the bulbs with 5 in 1 directly on live bulbs before unscrewing to let this effective formula penetrate the socket, loosen corrosion, and seal out moisture. This not only makes it easy to replace the bulb but prevents future corrosion as well.

Automotive industry

If you own an autobody shop, you must store service parts for repairs and replacements. You can use 5 in 1 spray to keep your repair parts and tools rust-free. This versatile spray provides long-lasting corrosion protection by protecting surfaces from moisture.

Buy Brodi 5 in 1 for Your Business Today

Stock up on Brodi 5 in 1 so that you have it on hand when you need an anti-corrosion spray that remains effective in any weather condition. Use it to protect outdoor lights, electrical connections, and stored repair parts in an industrial environment.

Contact us today for more information on 5 in 1 or about other HVAC, plumbing, and electrical products offered by Brodi.

How to easily loosen rusted bolts without damage

Rust bolts on rail with easy turn with liquid thread loosenerOne of the worst things that could happen to a bolt is rust. Heck, it could possibly be the worst thing that could happen to a bolt. Especially if it gets stuck and even more especially if you need to replace that bolt, because it’s a part of an important machine. What can you do to get this bolt off? Is there a way to get it without breaking your back pulling at it? Absolutely there is and we’ll show you how.

Continue reading How to easily loosen rusted bolts without damage

A handy, quick action industrial degreaser

Decal, tar and greaseSo you have a sticker on one of your machines that you want to remove? Is there grease on your machinery you want to get rid of? There are a some ways to fix this, but they tend not to work too well. You rip off stickers but usually there’s a chance you leave some residue. If try to clean the grease with a little spit and elbow grease you’ll find that way isn’t too effective. There is another way…

Continue reading A handy, quick action industrial degreaser

Fixing leaks, cracks and pinholes on cast iron pipes with steel epoxy putty

Cast Iron Pipes repair epoxy puttyThe cast iron pipe. A staple of plumbing for many years, the cast iron has held a special place in the hearts and plumbing systems of people around the world. But what happens when one of those precious pipes breaks? What if it leaks? How could someone possibly fix it by themselves without rigorous plumber training? Is it time to call a plumber and spend money you don’t have? Or is there… ANOTHER way?

Continue reading Fixing leaks, cracks and pinholes on cast iron pipes with steel epoxy putty

Using wood repair putty to restore small damages on wood structure finish?

stripped screw hole on wood structureWooden supports, beams, floors and other wooden parts can beautify just about any space, whether it be your home or place of business. It gives the place an old-time, rustic, down to earth kind of feel. However, the slow march of time can cause old wood to crack or wear down, making it look rustic but in a bad, trashy way. If this happens to your place of business, do you go out and buy new stuff? Hire a carpenter to tear it all down? Probably not, as some wood supports, beams, floors and other wooden parts are irreplaceable and an integral part of the interior design. So is there another way to restore your wood to it’s former glory?

Continue reading Using wood repair putty to restore small damages on wood structure finish?