Monthly Archives: October 2023

How to Fix Slow Running or Clogged Drains

Few household nuisances are as frustrating as slow-running or clogged drains. Whether it’s a sluggish bathtub drain or a sink that takes forever to clear, these issues can disrupt your daily routine and lead to unpleasant odors and potential water damage. Fear not, though; with a bit of knowledge and some basic tools, you can often tackle these problems on your own, saving time and money on professional plumbing services. In this in-depth guide, we’ll explore common causes of slow-running or clogged drains and provide effective solutions tailored to various scenarios.

Understanding Slow-Running Drains:

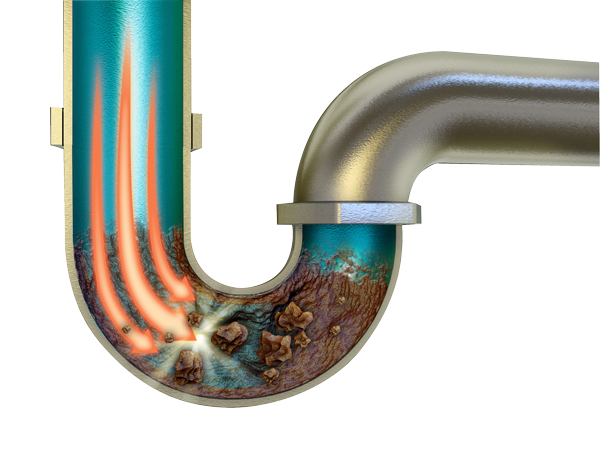
Before we dive into the solutions, it’s essential to understand why drains become slow or clogged in the first place. Various factors can contribute to this problem, including:

1. Hair and Soap Scum: In bathroom drains, hair and soap scum are common culprits for clogs. Over time, they can accumulate and restrict water flow.

2. Food Debris: In kitchen sinks, food particles, grease, and soap residue can build up in the drain, causing slow drainage.

3. Foreign Objects: Sometimes, foreign objects like jewelry or small toys can accidentally fall into drains, causing blockages.

4. Mineral Buildup: In areas with hard water, mineral deposits can accumulate in pipes, reducing their diameter and slowing water flow.

5. Tree Roots: In outdoor drains, invasive tree roots can penetrate pipes, causing blockages and damage.

How to Prevent a Clogged Drain

Preventing a clogged drain is far easier than dealing with the messy aftermath. With a few simple habits and preventive measures, you can significantly reduce the chances of your sinks, showers, and tubs succumbing to a clog.

1. Use Drain Screens: One of the easiest and most effective ways to prevent clogs is by using drain screens or catchers. These inexpensive devices fit over your drain openings, trapping hair, soap scum, food particles, and other debris before they enter the pipes. Regularly empty the screens and clean them to ensure optimal functionality.

2. Be Mindful of What Goes Down: Avoid treating your drains like garbage disposals. Don’t pour grease, oil, or large food scraps down the kitchen sink. Dispose of cooking oil in a container, and throw food scraps into the compost bin or trash. In the bathroom, dispose of facial tissues, cotton balls, and dental floss in the trash instead of flushing them down the toilet.

3. Regular Hot Water Flushing: Pouring hot water down the drain regularly can help dissolve accumulated grease and soap residue, keeping the pipes clear. Make it a monthly habit to pour a kettle of boiling water down each drain in your home. This simple practice can prevent buildup and keep water flowing freely.

4. Regular Cleaning: Clean your drains regularly, even if they aren’t showing signs of a clog. For kitchen sinks, bathroom sinks and tubs, use fix clogged drains solution and remove the drain stoppers and clean them thoroughly, removing any hair or debris that might have accumulated. Regular cleaning prevents the gradual buildup of substances that lead to clogs.

5. Be Careful with Chemical Cleaners: While chemical drain cleaners can be effective, they are also harsh on your pipes and the environment. If you choose to use them, follow the instructions carefully and consider natural alternatives first. Chemical cleaners should be a last resort and used sparingly to avoid damaging your plumbing system.

6. Professional Drain Inspections: Consider scheduling regular professional drain inspections, especially if you live in an older home or suspect underlying issues. Plumbers can use specialized tools like drain cameras to inspect the interior of your pipes, detecting potential problems before they escalate into full-blown clogs.

By adopting these preventive measures and being mindful of what goes down your drains, you can significantly reduce the risk of encountering clogged pipes. Regular maintenance and a few simple habits can save you from the inconvenience and expense of dealing with blocked drains, ensuring a smoothly flowing plumbing system in your home.

Choosing the Best Drain Cleaner for Kitchen, Bathroom and Other Drain Clogs

When it comes to tackling stubborn clogs in your kitchen, bathroom, or any other drain in your home, finding a powerful yet safe solution is paramount. Liquiflo Drain Cleaner emerges as a reliable choice, offering a multitude of benefits and versatile applications.

Benefits of Liquiflo Drain Cleaner:

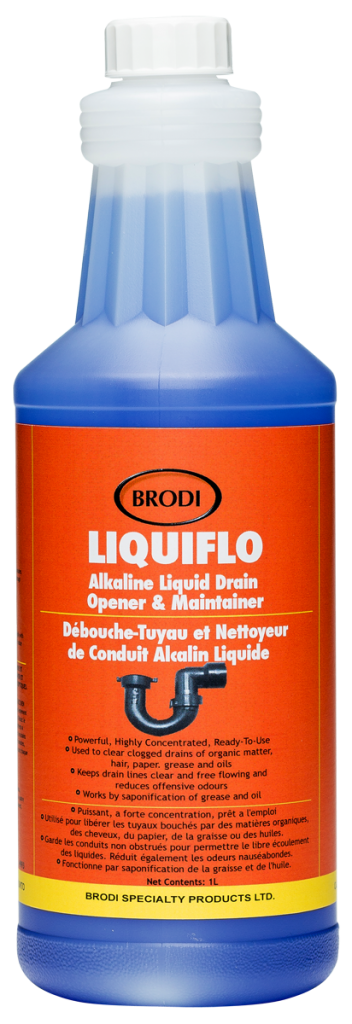
Fumeless and Odorless: Liquiflo Drain Cleaner stands out as a fumeless and odorless option. This feature makes it perfect for use in all areas, ensuring that offensive odors and fumes won’t disturb your surroundings.

Effective Kitchen Solution: In kitchen drains, Liquiflo Drain Cleaner excels at breaking down food build-up and coffee grounds. Its powerful formula dissolves organic matter, grease, and oils, leaving your kitchen drains clear and free-flowing.

Ideal for Bathtubs: Liquiflo Drain Cleaner is specifically designed to tackle hair and soap build-up inside drain pipes, making it a perfect choice for bathtubs. It effortlessly dissolves accumulated residues, ensuring your bathwater drains smoothly.

Prevents Unpleasant Odors: As a drain maintainer, Liquiflo keeps drain lines clear and free-flowing, which, in turn, reduces offensive odors. This is particularly beneficial in environments where the accumulation of rancid organic materials can lead to unpleasant smells.

Versatile Usage in Various Settings: Liquiflo Drain Cleaner is not just limited to home use. It is highly recommended for preventive maintenance in drinking fountains, making it an excellent choice for public spaces and commercial establishments.

Perfect for Specialized Facilities: Its efficacy is not limited to regular drains. Liquiflo is an excellent solution for plaster traps commonly found in dental offices and hospital fracture clinics. It is also a go-to option in hospitals and healthcare facilities for breaking down biofilm accumulation in drains, ensuring a hygienic environment.

Unclogs Various Fixtures: Liquiflo Drain Cleaner is versatile enough to be used in floor drains, toilets, urinals, and any other blocked or slow-running drains. Its powerful formula dissolves blockages, allowing water to flow freely once again.

Liquiflo fix clogged drains stands as a potent solution for a variety of drain-related challenges. Its fumeless and odorless nature, coupled with its effectiveness in dissolving a wide range of materials, makes it an ideal choice for both home and commercial use. From kitchens to bathrooms, public areas to specialized facilities, Liquiflo Drain Cleaner offers a versatile and reliable way to keep your drains clear, free-flowing, and odor-free. Choosing Liquiflo means choosing efficiency, versatility, and a hassle-free solution to your drain clogging woes.

Preventing Future Issues:

Regular Cleaning: Run hot water down the drains weekly to help prevent the buildup of soap scum and grease.

Use Drain Strainers: Install drain strainers in sinks and bathtubs to catch hair and debris, preventing them from entering the drains.

Be Mindful of What Goes Down the Drain: Avoid pouring grease, coffee grounds, or food particles down the sink. Dispose of these items properly.

Monthly Maintenance: Consider a monthly maintenance routine using fix clogged drains product  to keep drains clear.

By following these steps and staying vigilant about preventive measures, you can effectively tackle slow-running or clogged drains in your home. Remember, patience and persistence are key, and if a clog persists despite your efforts, don’t hesitate to seek professional plumbing assistance. With the right techniques and a proactive approach, you can keep your drains running smoothly, ensuring a hassle-free plumbing experience in your household.

How to Choose the Best Air-Conditioner Coil Cleaner: A Buyer’s Guide

In the sweltering heat of summer or the biting cold of winter, your indoor air conditioner becomes a sanctuary, ensuring your home is a comfortable haven. Behind the scenes, a crucial component works tirelessly to maintain that comfort: the air-conditioner coil. Over time, these coils accumulate dirt, dust, and debris, leading to reduced efficiency and potentially higher energy bills. Regular cleaning is essential to keep your AC unit running smoothly, and choosing the right coil cleaner is paramount to the process. In this comprehensive buyer’s guide, we’ll navigate the maze of options and provide you with the knowledge needed to make an informed decision.

Understanding the Importance of Clean Air-Conditioner Coils

Before delving into the specifics of coil cleaners, it’s essential to understand why clean coils are vital for your AC unit’s performance. Air-conditioner coils are responsible for exchanging heat, enabling your system to cool or heat the air effectively. When these coils are clogged with dirt and debris, their efficiency diminishes. This inefficiency can lead to:

  • Higher Energy Bills: A clogged coil forces your AC unit to work harder to achieve the desired temperature, leading to increased energy consumption.
  • Reduced Lifespan: The strain caused by dirty coils can lead to wear and tear on the entire system, potentially shortening its lifespan.
  • Poor Indoor Air Quality: Dirty coils can circulate allergens and pollutants throughout your home, degrading your indoor air quality.

Given these consequences, investing in a high-quality air-conditioner coil cleaner is a wise decision for both your wallet and your health.

Types of Air-Conditioner Coil Cleaners

1. AC Coil Cleaner Indoor:

Specifically designed for indoor units, these cleaners are formulated to remove indoor pollutants, mold, and mildew that can accumulate on the coils.

2. Coil Cleaner No Rinse:

No-rinse coil cleaners are convenient solutions that don’t require washing the coils after application. They are ideal for quick and easy cleaning.

3. Coil Cleaner Window Air Conditioner:

Window AC units have coils that are exposed to outdoor elements. Coil cleaners designed for window air conditioners are robust enough to tackle outdoor debris and pollutants.

4. Coil Cleaner Nu-Calgon:

Nu-Calgon is a reputable brand known for its high-quality coil cleaners. Products from this brand are often trusted by professionals for their effectiveness.

5. Coil Cleaner Evaporator:

Evaporator coils are prone to mold growth due to their damp environment. Evaporator coil cleaners are specifically formulated to tackle mold and mildew.

6. Coil Cleaner Condenser:

Condenser coils are located in the outdoor unit and are exposed to various environmental elements. Condenser coil cleaners are heavy-duty solutions designed to remove stubborn dirt and debris.

Reasons to Clean Air Conditioner Units with Coil Cleaner

Air conditioners have become an indispensable part of modern living, ensuring our homes remain comfortable throughout the changing seasons. However, just like any other appliance, air conditioners require regular maintenance to function efficiently. One of the most critical aspects of AC maintenance is cleaning the coils using a dedicated air-conditioner coil cleaner. Here are compelling reasons why regular coil cleaning is essential for your air conditioner unit:

1. Enhanced Energy Efficiency:

Over time, dirt, dust, and debris accumulate on the coils, hindering the heat exchange process. When the coils are clean, they can absorb and release heat more effectively. This means your AC unit doesn’t have to work as hard to cool or heat the air, resulting in lower energy consumption and reduced utility bills.

2. Extended Lifespan:

A well-maintained air conditioner lasts longer. When coils are clean and free from obstructions, the entire system experiences less strain. This reduced workload can significantly extend the lifespan of your AC unit, saving you money on premature replacements or expensive repairs.

3. Improved Indoor Air Quality:

Dirty coils can become a breeding ground for mold, bacteria, and other harmful microorganisms. When the AC is running, these contaminants can be circulated throughout your home, leading to poor indoor air quality. Regular coil cleaning with a suitable cleaner eliminates these health hazards, ensuring the air you breathe is clean and healthy.

4. Prevention of Costly Repairs:

Neglecting coil cleaning can lead to various issues, such as frozen coils and compressor failures. These problems often require costly repairs and can disrupt your home comfort, especially during extreme weather conditions. Regular cleaning with a coil cleaner can prevent such issues, saving you from unexpected repair expenses.

5. Consistent Performance:

Clean coils contribute to consistent and reliable AC performance. When your air conditioner is well-maintained, it can maintain a consistent temperature and humidity level in your home. This consistency ensures your comfort, especially during scorching summers or chilly winters.

6. Reduction in Allergens and Irritants:

Pollen, dust mites, and other allergens can accumulate on dirty coils. When the AC is turned on, these particles can be circulated in the air, triggering allergies and respiratory issues, especially in sensitive individuals. Regular cleaning eliminates these allergens, creating a healthier environment for you and your family.

7. Compliance with Manufacturer’s Warranty:

Many air conditioner manufacturers include regular maintenance, including coil cleaning, as a requirement for warranty coverage. By adhering to the manufacturer’s maintenance guidelines, you ensure that your unit remains eligible for warranty-related repairs or replacements, offering valuable peace of mind.

8. Sustainable Living:

Clean coils contribute to a more sustainable lifestyle. An efficiently running AC unit consumes less energy, reducing your overall carbon footprint. By maintaining your air conditioner with regular coil cleaning, you’re actively contributing to environmental conservation efforts.

Factors to Consider When Choosing an Air-Conditioner Coil Cleaner

1. Type of AC Unit:

Consider the type of air conditioner you have, whether it’s a central AC system, window unit, or a split system. Different units may require specific types of coil cleaners.

2. Coil Material:

Coils can be made from copper, aluminum, or other materials. Some cleaners are formulated for specific coil materials, ensuring safe and effective cleaning.

3. Ease of Application:

Look for coil cleaners that come with easy-to-follow instructions and user-friendly application methods. This is especially important for DIY enthusiasts who want hassle-free cleaning.

4. Rinsing Requirements:

Determine whether you prefer a no-rinse formula for quick cleaning or if you’re willing to rinse the coils after applying the cleaner. No-rinse options save time and effort.

5. Environmental Considerations:

If you’re environmentally conscious, opt for coil cleaners that are biodegradable and eco-friendly. These options minimize your environmental impact while ensuring a clean system.

6. Brand Reputation:

Research reputable brands like Nu-Calgon and other established names in the HVAC industry. Reliable brands often provide high-quality products and comprehensive customer support.

7. Budget:

Consider your budgetary constraints. While it’s tempting to choose the cheapest option, investing in a slightly more expensive, high-quality cleaner can pay off in terms of efficiency and longevity of your AC unit.

How often should clean air conditioner coils to get maximum cooling efficiency

To ensure your air conditioner operates at its maximum cooling efficiency, it’s essential to establish a regular cleaning schedule for the coils. As a general rule of thumb, homeowners should aim to clean their air conditioner coils at least once a year, preferably before the start of the cooling season. This annual cleaning helps to remove accumulated dirt, dust, and debris that can hinder the heat exchange process. However, the frequency of cleaning may vary based on environmental factors. If you live in a particularly dusty area or an environment prone to pollutants, more frequent cleaning, perhaps every six months, might be necessary. Commercial and industrial settings, where AC units often work harder, may require even more frequent cleaning, possibly on a quarterly or monthly basis. By adhering to a regular cleaning routine tailored to your specific environment, you not only ensure optimal cooling efficiency but also extend the lifespan of your HVAC system, saving you money on energy bills and potential repair costs in the long run.

Conclusion

Choosing the best air-conditioner coil cleaner is essential for maintaining your HVAC system’s efficiency and longevity. By understanding the different types of coil cleaners, considering important factors, and exploring top-rated products, you can make an informed decision tailored to your specific needs. Regular cleaning not only ensures a comfortable indoor environment but also contributes to energy savings and a healthier home. Invest in the right coil cleaner today and enjoy the benefits of a well-maintained air conditioning system.

Pipe wrap: Everything You Need to Know About Protecting Your Pipes

Pipes are the unsung heroes of our homes and buildings, carrying water, gas, and other essential utilities to every corner. However, these vital components are often out of sight and out of mind until a problem arises. One of the best ways to ensure the longevity and functionality of your pipes is by using pipewrap, a simple yet highly effective solution. In this comprehensive guide, we will delve deep into the world of pipewrap, exploring its importance, types, installation methods, and the benefits it offers. By the end of this article, you’ll have a thorough understanding of how pipewrap can protect your pipes and save you from potential disasters.

What are the benefits of insulation on pipes? 

Using pipe wrap offers a multitude of benefits, making it a wise investment for homeowners and businesses alike:

Prevents Corrosion: Pipewrap acts as a barrier against moisture, preventing corrosion and extending the lifespan of the pipes.

Energy Efficiency: Properly insulated pipes lead to reduced heat loss, improving energy efficiency in heating systems and lowering utility bills.

Prevents Freezing: In cold climates, pipewrap prevents pipes from freezing by providing insulation against low temperatures.

Reduces Condensation: Insulated pipes are less prone to condensation, preventing water damage and mold growth.

Enhances Safety: Insulated pipes are less likely to burst or leak, reducing the risk of water damage and potential accidents.

Saves Money: By preventing pipe damage and increasing energy efficiency, pipe wrap ultimately saves homeowners and businesses money on repairs and utility bills.

Understanding Pipewrap Types is Essential for Property Owners

The growing importance of pipe insulation in modern construction cannot be overstated, especially in an era where energy efficiency and sustainability are paramount. Properly insulated pipes significantly contribute to conserving energy, reducing heat loss, and cutting down utility costs. For property owners, understanding the different types of pipewrap is essential. Each type, whether it’s fiberglass, foam, rubber, aluminum foil, or PVC, offers distinct advantages and is tailored for specific applications. Having a comprehensive knowledge of these materials empowers property owners to make informed choices that align with their specific needs and environmental conditions. By selecting the right pipewrap type, property owners not only protect their investments by ensuring the longevity and functionality of their pipes but also actively contribute to a greener and more energy-efficient future. In a world where environmental consciousness and economic prudence go hand in hand, understanding pipewrap types has become a fundamental aspect of responsible property ownership.

Different Types of Pipe Insulation

Pipewrap, also known as pipe insulation wrap or pipe wrap tape, is a protective covering that shields pipes from external elements. It comes in various types, each designed to cater to specific needs:

Fiberglass Pipewrap: Fiberglass pipewrap is lightweight and offers excellent thermal insulation. It is resistant to moisture, chemicals, and high temperatures, making it suitable for both indoor and outdoor use.

Foam Pipewrap: Foam pipe insulators is easy to install and provides good insulation properties. It is particularly effective in preventing condensation on pipes carrying cold water.

Rubber Pipewrap: Rubber pipewrap is highly flexible and resistant to moisture, making it ideal for pipes in damp or wet environments. It is also durable and can withstand extreme weather conditions.

Aluminum Foil Pipewrap: Aluminum foil pipewrap reflects heat and provides insulation. It is often used in HVAC systems to enhance energy efficiency.

PVC Pipewrap: PVC pipewrap is resistant to chemicals and offers excellent protection against corrosion. It is commonly used in industrial settings where pipes are exposed to harsh substances.

Insulation pipe wrap: A Step-by-Step Guide

Insulation for pipes is a relatively straightforward process that can be done by homeowners or professionals. Here’s a step-by-step guide to help you install pipewrap effectively:

Prepare the Surface: Ensure the pipes are clean and dry before applying insulate pipes. Remove any dirt, rust, or old insulation material.

Measure and Cut: Measure the length of the pipe and cut the pipewrap material accordingly. It’s essential to have a snug fit to maximize insulation effectiveness.

Apply Adhesive (If Required): Some pipewrap materials come with adhesive backing. If your insulating pipes requires adhesive, remove the protective covering and wrap the material tightly around the pipe, pressing firmly to secure it in place.

Overlap Properly: If you are using tape-style pipewrap, ensure that each pipe wrap around overlaps the previous one by at least half its width. This prevents gaps and ensures uniform insulation.

Secure the Ends: Use additional tape or adhesive to secure the ends of the pipewrap, ensuring there are no openings where moisture or air can seep in.

Inspect and Repair: After insulation pipe wrap, inspect the wrapped pipes for any gaps or loose sections. If you find any issues, repair them immediately to maintain the integrity of the insulation.

Troubleshooting Pipewrap Installations: Ensuring a Seamless Shield for Your Pipes

Wrapping pipe insulation can significantly enhance the durability and efficiency of your plumbing system, occasional issues may arise during or after the process. Identifying and addressing these problems promptly is crucial to ensuring your pipes remain well-protected. We will explore common installation mistakes, signs of poorly installed pipewrap, and handy DIY repair tips to troubleshoot any minor problems that might occur.

A. Common Installation Mistakes: How to Avoid Them

  • Incomplete Surface Preparation:

Mistake: Inadequate cleaning before installation can hinder the pipewrap’s adhesion.

Solution: Thoroughly clean and dry the pipes before applying the pipewrap to ensure proper bonding.

  • Incorrect Overlapping:

Mistake: Incorrect overlapping can create gaps in the insulation, reducing its effectiveness.

Solution: Follow the manufacturer’s guidelines regarding overlapping to ensure a snug fit without gaps.

  • Insufficient Adhesive Application:

Mistake: Insufficient adhesive application can lead to loose pipewrap, reducing its protective capabilities.

Solution: Apply adhesive evenly, following the instructions provided, and firmly press the wrap in place for secure adhesion.

B. Signs of Poorly Installed Pipewrap: Identifying Issues Early

  • Visible Gaps or Loose Ends:

Issue: Gaps or loose ends indicate improper installation, compromising insulation.

Solution: Reapply pipewrap to cover gaps and secure loose ends, ensuring a seamless fit.

  • Condensation Buildup:

Issue: Condensation forming on pipes suggests inadequate insulation, allowing temperature fluctuations.

Solution: Reinforce the insulation by adding an extra layer of pipewrap, especially in areas prone to condensation.

  • Deterioration or Mold Growth:

Issue: Deterioration or mold growth under the pipewrap signifies moisture infiltration.

Solution: Remove the damaged section, address the underlying issue causing moisture, and reinstall pipewrap properly.

C. DIY Repair Tips: Fixing Minor Problems with Pipewrap

  • Patchwork Repair:

Issue: Small tears or damages in the pipewrap.

Solution: Use compatible patching material to cover the damaged area, ensuring airtight sealing.

  • Reinforcement with Tape:

Issue: Loose pipewrap or gaps in insulation.

Solution: Use specialized pipewrap tape to reinforce loose sections and seal gaps, enhancing overall insulation.

  • Regular Inspection and Maintenance:

Issue: Potential wear and tear over time.

Solution: Regularly inspect pipewrap for signs of damage, and conduct minor repairs promptly to prevent issues from escalating.

Comparison of Pipe wrap Insulation: Pros and Cons

In the world of pipewrap materials, choosing the right one is pivotal for ensuring the longevity and efficiency of your plumbing system. With options like fiberglass, foam, rubber, aluminum foil, spray pipe insulation, and PVC pipewrap available, it’s essential to understand their pros and cons. In this comprehensive guide, we will delve deep into the strengths and weaknesses of each material, helping you make an informed decision tailored to your specific needs. Additionally, we will explore real-life testimonials, providing firsthand insights into users’ experiences with different pipewrap types.

A. Analyzing Fiberglass, Foam, Rubber, Aluminum Foil, and PVC Pipewrap

1. Fiberglass Pipewrap:

Pros: Lightweight, excellent thermal insulation, resistant to moisture and chemicals.

Cons: Fragile, may require additional protective layer in harsh environments.

2. Foam Pipewrap:

Pros: Easy to install, good insulation properties, effective against condensation.

Cons: Less durable than other materials, may compress over time.

3. Rubber Pipewrap:

Pros: Highly flexible, moisture-resistant, durable, suitable for damp environments.

Cons: Vulnerable to extreme temperatures, may degrade over time.

4. Aluminum Foil Pipewrap:

Pros: Reflects heat, enhances energy efficiency, resistant to moisture.

Cons: Prone to tearing, may require careful handling during installation.

5. PVC Pipewrap:

Pros: Chemical-resistant, protects against corrosion, durable.

Cons: Less flexible than rubber, may crack in very low temperatures.

B. Which Pipe Wrapping Insulation is Ideal for Your Specific Needs?

Choosing the right pipewrap material depends on your unique requirements. For instance, if you’re dealing with a damp environment, rubber pipewrap’s moisture resistance might be invaluable. In areas with extreme temperature fluctuations, fiberglass or foam pipewrap could be preferable due to their excellent thermal insulation properties. Evaluate your specific situation, considering factors like temperature, moisture, and potential wear and tear, to determine the most suitable material for your pipes.

C. Real-Life Testimonials: Users’ Experiences with Different Pipewrap Types

Real-life testimonials provide invaluable insights into the practical aspects of pipewrap materials. Users’ experiences reveal the ease of installation, long-term durability, and ability to withstand varying conditions.

Sarah, a homeowner from New York, shares, “We opted for foam pipewrap, and it made a significant difference in our utility bills. The insulation was easy to install, and even in the freezing winter, our pipes remained warm, preventing any potential issues.”

John, a facilities manager, adds, “In our industrial setting, we found rubber pipewrap to be a lifesaver. Its flexibility allowed us to cover even the most complex pipes, ensuring long-lasting protection against moisture and wear.”

Why Pipe Protection is Crucial: Safeguarding the Lifelines of Your Home

Pipes, the silent heroes of our homes, play a crucial role in our daily lives, ensuring the smooth flow of water, gas, and other essentials. However, these vital conduits often operate unnoticed until a problem arises. Protecting them is not just a matter of convenience; it’s a necessity. The reasons why pipe protection is absolutely crucial, exploring common threats that pipes face and the dire consequences of neglecting their maintenance.

A. Common Threats to Pipes: Corrosion, Physical Damage, and Temperature Fluctuations

1. Corrosion:

Pipes are vulnerable to corrosion, especially in regions with hard water. Over time, this natural process weakens the pipes, leading to leaks and reduced efficiency.

2. Physical Damage:

Whether due to accidental impacts during construction or natural disasters, physical damage can compromise the structural integrity of pipes, making them prone to sudden failures.

3. Temperature Fluctuations:

Extreme temperatures can cause pipes to expand and contract, stressing their materials. This strain can weaken joints and connections, increasing the risk of leaks.

B. Consequences of Neglect: Repair Costs, Water Wastage, and Safety Hazards

1. Repair Costs:

Neglected pipes are a disaster waiting to happen. The longer the issues persist, the more extensive the damage becomes, leading to costly repairs. Timely protection can prevent these expenses.

2. Water Wastage:

Leaking pipes waste an enormous amount of water. In a world facing water scarcity, these precious resources should not be squandered. Protecting pipes prevents unnecessary wastage.

3. Safety Hazards:

Damaged pipes can lead to a variety of safety hazards, including water damage to your property’s structure, electrical issues, and even the growth of hazardous molds. These dangers can be avoided through proactive pipe protection measures.

Environmental Considerations: Eco-Friendly wrap for pipes Solutions

In the realm of environmental considerations and eco-friendly pipe protection solutions, Brodi Pipewrap stands out with its innovative spray-on anti-sweat insulating coating. Designed to address the challenges posed by intricate plumbing installations, this advanced solution goes beyond conventional methods. 

Pipewrap

By preventing condensation buildup, Brodi Pipewrap not only ensures the integrity of the pipes but also contributes significantly to environmental conservation. The spray-on application not only covers even the most complex pipe configurations effectively but also minimizes material wastage, aligning with sustainable practices. In an era where environmental consciousness is paramount, Brodi Pipewrap’s eco-friendly approach not only ensures the durability of plumbing systems but also reflects a commitment to reducing the overall environmental impact of pipe protection methods.

Conclusion

In conclusion, pipewrap is a cost-effective and practical solution for protecting your pipes from various threats. Whether you are a homeowner, a business owner, or an industrial manager, investing in high-quality pipewrap can safeguard your infrastructure, enhance efficiency, and save you money in the long run. By understanding the types of pipewrap available, the installation process, and the benefits it offers, you can make an informed decision to ensure the longevity and functionality of your pipes. Don’t wait for a pipe disaster to strike; take proactive measures today and wrap your pipes for a secure and worry-free future.